Pale & pastel prettiness
Hey Magpies! It’s October already, how did that happen! This month I decided to do some pale & pastel LO’s. I’ll let you decide how successful I was…
I ordered a lot of pastel stuff from the shop, mainly from the Maggie Holmes Carousel and Maggie Holmes Chasing Dreams collections and I used a lot of the Nuvo Jewel Drops and then I dug into my really old Maggie Holmes collections as well. I do love Maggie Holmes cause they always co-ordinate together so when you get a new collection you can always mix in some older bits because they will go.
This was my first LO. I started with the reverse side of a Maggie Holmes Chasing Dreams paper, Lovely Paper. I made a little bit of a border at the bottom of the page using Washi Tape. I was totally inspired by fellow DT member Julie Taylor to do that, she does amazing borders! I did a border using Nuvo Jewel Drops in Seabreeze. I did some painting on my background and then used some embossing paste and a Vicki Boutin Stencil for texture. There are some Heidi Swapp Texture Pastes in different colours in the store which are the same as embossing paste, have a look here, that teal one has my name all over it! I layered up a doily along with some bits from various Die-cuts packs and also some of the tickets from the super awesome, Carousel Admissions Die-Cut Perforated Sheet, this sheet is a pull apart sheet making loads and loads of tickets which are great for tucking behind things. I used some word stickers from the Chasing Dreams Word Sticker Sheet and some of the Chasing Dreams Chipboard Thickers Stickers. My title uses the ‘hello’ from the Chasing Dreams Ephemera Die-Cuts Pack and Freckled Fawn Puffy Alphabet stickers.

![]()
My next LO, well, this was a real labour of love! Honestly, I absolutely love the effect and this LO will be displayed somewhere in my home, but it took soooooo long! I also can not take credit for the idea either, I saw a LO online somewhere where someone had made a background shape of Mickey Mouse ears and filled it with enamel dots. I can’t remember where I saw it now and when I searched, I found lots of LO’s like that so I’m not even sure who did the original that is inspiring everyone, but it wasn’t my idea.
I drew a heart on a piece of cardstock and when I was happy with it, I cut it out to make a stencil. I lay that over my background with some Herma to hold it in place. I also drew a rough outline of where my photo was going to be. And I started dotting!
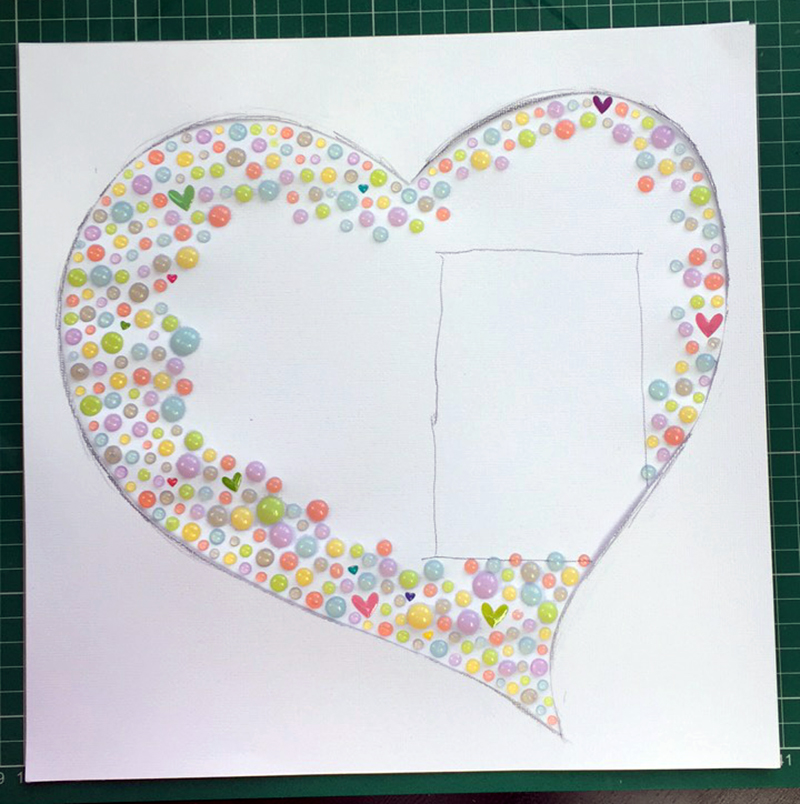
I used Nuvo Jewel Drops in Grey Mist, Key Lime, Limoncello, Periwinkle, Rosewater and Seabreeze. I also dotted around some of the Enamel Heart Stickers from Hey Little Magpie, and these ones too Pastel Midi Size. I did my dotting in shifts. I have found that when you’re putting different colours close to each other, it’s much better to let one colour dry before using the next colour, they’re not likely to join together that way. I found when I was making the arrow shape on last months blog post (see it here, it’s all about Nuvo Crystal Drops), if I didn’t let the drops dry, they would very easily join together which was super frustrating! So I would dot around on this LO and do a few ‘lines’ inside the stencil and then leave it alonre for a few hours. When you’re doing something like this, you are likely to stick your finger or arm into a dot, or brush against something by mistake, no matter how careful you’re being. So I’ve learned to be cautious and take my time for a better result.
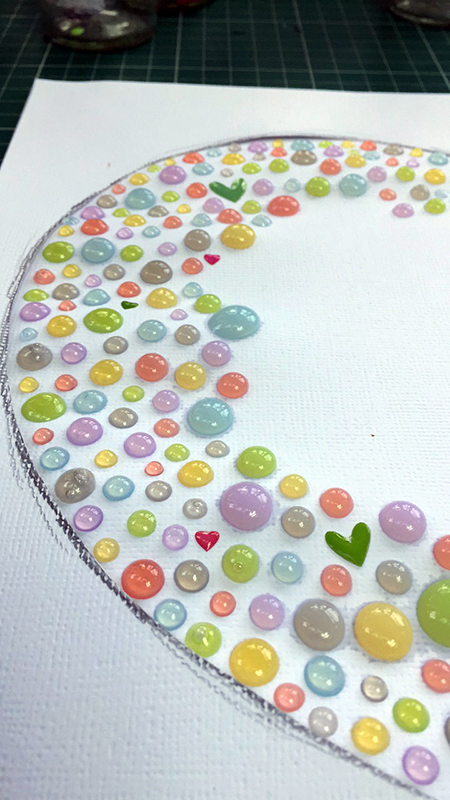
The dotting did take me a couple of days to complete in shifts. I did wonder why I’d started sometimes but the effect is amazing in real life so I’m glad I stuck with it. This LO really should me on last months post shouldn’t it! I decided to sew around the edge with some pink embroidery thread and then it still just needed something, so I dotted around with some Black Nuvo Crystal Drops. I really messed those dots up around the point of the heart but did you notice that before I pointed it out? I think you don’t really notice that much when you’re looking at the LO as a whole but they are a right mess! They were too small so I tired to make some bigger and the dots started going all to pot then. So I left it and hoped for the best and I honestly don’t think it’s noticeable if it’s not pointed out. What do you think?

I didn’t think I needed much else on this LO so I’ve kept it very simple. I used a leftover strip of striped paper under the bottom of the photo to help ground it. The title and little hearts are from Carousel, Cirque Puffy Accent Thickers and I used a couple of puffy stickers from the Chasing Dreams Puffy Accent Stickers Pack on the photo.
![]()
Oh man, this next LO was so easy! I think I’m starting to lose the pastel plot here but compared to my usual colourful LO’s, these are pale! This LO is just a photo and two tags from the Chasing Dreams Ephemera Die-Cuts Pack. Then I carried on layering more of the die-cuts around, some I put on foam pads to add some dimension. Some more washi tape and Nuvo Jewel Drops, I used Key Lime, Limoncello, Seabreeze and Rosewater and a few stickers from the Chasing Dreams Puffy Stickers Pack finished things off. So simple to make, get out those die-cuts people and use them!

![]()
I started this LO with the Carousel Marquee Paper to make a border and then I used the same paper from the Carousel 6×8″ Paper Pad to build my layers on. I layered up some black & white cardstock a doiley and then my photo. I couldn’t find a tag that worked in my various ephemera packs so I cut my own. My title is a large acrylic word I designed and had cut myself, the ‘happy’ and some of the accents are from the Carousel Cirque Puffy Thickers pack and ‘together’ and some of the other stickers are from the Chasing Dreams Chipboard Accent Thickers pack. I dotted around 3 of the edges with Rosewater Nuvo Jewel Drops.

![]()
My last 2 LO’s are more super simple ones. This one I took my photo and mounted it on some black & white striped paper that’s been hanging around on my desk. Then I cut a piece from the Carousel 6×8″ Paper Pad to go beside my photo. I put some Washi Tape above and below. The black & white striped tape is my favourite and it was from the Bella Blvd. Make Your Mark collection but it is out of stock now sorry. I bought a few rolls because it’s the perfect stripe and the perfect width tape for me! I use it a lot. Because I’ve done a Wimbledon photo (it’s Mum and I in front of Henman Hill/Murray Mound), I embossed some large circles with a Vicky Boutin Stencil and embossing paste, cause you know, tennis balls and all that! My title is from the Chasing Dreams 6×12″ Sticker Sheet and some Freckled Fawn Alpha Stickers. I also used a couple of chipboard stickers from the MAMBI Vacation Sticker Pack. The big butterfly sticker is from the Chasing Dreams Fringed Butterflies Pack and they’re just fabulous in real life, a great embellishment!

![]()
My last LO and this time I just raided all my Maggie Holmes Ephemera Packs and picked out some tags and things to layer across my LO. I don’t know about you but I am quite good at holding on to Die-Cuts and Ephemera. I tend to keep things thinking, I’ll put that aside for that ‘special’ LO and then it sits in a box. And we all know there will be more coming along in a new collection soon, so if you use up one pack, you can buy another! But we’ll all never run out will we. So I raided my past Maggie Holmes bags and picked out bits to use. These come from all the old collections because I’ve bought them all! I just layered them across the page, some are on foam pads for some dimension and I used some chipboard bits too. This was such a simple LO, of course I fiddled about with the ‘exact’ placement of things for a day or so but eventually I get to the ‘oh just stick it down already’ stage and away I go. My title is from the Amy Tangerine, Hustle & Heart Thickers Pack (there’s gold & white in that pack). Across the bottom of the LO I used a strip of paper that was on my desk, some Nuvo Dots in Bubblegum Blush and Dandelion Yellow. This LO came together so easily girls, go on, haul out that old ephemera you’re hoarding and get going too!

![]()
So that was me attempting to do some pale, pastel LO’s. I think I failed miserably lol! I let too much colour in, I just can’t help myself! Also, really good ways to make things look pastel, if you don’t have any pastel colours, is to add a layer of Gesso or white acrylic paint over the top to tone things down. Or add some vellum. I did try doing these things but nothing I tried worked how I wanted it to! But they are good ways to make brighter papers look pastel if you want to achieve the pastel look but don’t have anything appropriate on hand. Please share on our Facebook Inspiration Group (you have to join) if you do get inspired to create a pastel LO, I’d LOVE to see it! And please leave a comment if there is any specific embellishment you want to know about. I don’t like to every single little thing and I know how annoying it is when you want to know about something particular and it’s not mentioned. Sometimes you just have to know where that one little thing came from eh! See you next month Magpies xXx
